Share this
by Seven Peaks on Mar 24, 2022 11:38:00 AM
A definitive guide by Android developers
On February 17th 2022, Seven Peaks Software held an online meetup, to talk about Android Development. The topic that we chose was How to code effectively with MAD.
MAD is modern android development. 3 speakers of Android experts giving out their knowledge and expertise to show us on Modern development tools and components for Android to be productive in 2022.
Background Processing with Work Manager
Our first speaker, Fedor Erofeev opened the meetup by talking about Background Processing With Work Manager in which he taught us about the best practices of scheduling one-time and periodic background work with Jetpack Work Manager.
There is no doubt that background processing is one of the hardest topics to talk about in Android. Google recommended Jetpack WorkManager to handle background processing. Fedor also recommended to use WorkManager because it has some benefits, which are:
- Guaranteed: The work is guaranteed to execute.
- Work constraints: Specify best conditions for work. For example:
- When the device is using Wi-Fi
- The device is charging
- The device is idle
- Etc.
- Flexible scheduling: One-time and repeated work:
- Can be delayed
- Minimum period between repeated work — 15 minutes
- Retry policies: Provide retry policies in case there are some errors during execution.
- Work chaining:Chain multiple works in specific order with specific constraints.
- Works with RxJava and Coroutines.
- Built-in functionality for long work:Run in the foreground and show notifications while the worker does the work.
- Integration with Hilt: Easily inject dependencies using only 3 annotations:
- @HiltWorker, @AssistedInject, @Assisted
However there are no perfect tools. WorkManager also have some disadvantages, these are…
- Not precise: Repeated work is executed depending on various conditions and can be delayed by some time.
- Fast work doesn’t show notifications: The built-in functionality for notifications automatically removes the notification once the job is done. If your work is quick there is a big chance the notification will not appear at all (possible to use regular notification in this case).
After we understand the Advantages and disadvantages of WorkManager, we need to know when to use it. According to Fedor there are two types of time when we need to know when to use WorkManager. These are one time or periodic. For one-time work you can choose expedited
mode which is available in work manager 2.7 where this means this work will be executed faster than regular work and it will be less affected by device workload and other limitations. For periodic work or long-running work there is a functionality that let us to run work in the context of a foreground server service and it will show you a notification that will be automatically dismissed after some time once the work is done and deferrable uh which means that it will be executed sometime in the future and we can just do the work without any notification.
After we understand about the right time to use the WorkManager, now is the time to know how to use it.
The first step to use WorkManager is to create a worker. After the first step is done, the next step is to create work requests. In the work requests there are two types; One time work requests or Periodic work requests.
To understand more about how to create work requests for both One time work requests and periodic work requests , watch Fedor deep explanation in our YouTube channel.

|
Fedor Erofeev, Senior Android Developer at Seven Peaks Fedor has more than 7 years of experience working with Android, and has been featured in El Androide Libre by El Espanol. He has worked on various projects with over 1 million downloads, has created multiple personal applications that generated 700k+ downloads on Google Play, among which is one of the top-grossing Android widget at 500k downloads. Fedor is passionate about software design patterns and architecture, problem solving, and keeping abreast of new technologies. |
Layout Preview Tooling
Next speaker is Phattarapong (O) Yodwiset the Mid-level Android developer. O shares us some “Layout Preview Tools” aka “Tools Attributes” that help him work more effectively.
What are “Tools Attributes”?
Tools attributes are “XML attributes” which also goes under “tools namespace”. They come with the ability to let us see the layout preview without leaving any effects on the APK size. This also means that when we build it as the APK size or running it on the real device, all the tools attributes will be deleted and we will not be able to see it.
How to use “Tools Attributes”?
We have to add “tools namespace” in our “root element” of the XML file that we want to use. Add “tools” and the auto suggestion will come up.

Here are some useful tools attributes examples that will help you work faster as they will not affect the APK size but still visible in layout preview.
Design-time View Attributes
When we are setting the text, we normally type android:text, but if you want to use tools attributes, just change the prefix “android” to “tools”, like this tools:text. This includes other commands as well, such as, android:visibility or android:layout_width. We can change it to “tools” and all consequences will only happen in the layout preview.
tools:text

|

|
From the images above, there are 2 Textviews here, the first one is ‘first name’ which he saved it as android:text=”James” and the second one is ‘last name’ which uses tools:text=”Bond”.
As you can see in the layout preview, there are both ‘James’ and ‘Bond’, but when we run it, we can only see ‘James’. Tools attributes will not show up on the emulator or real devices meaning that only the first name, ‘James’, will be shown here.
Both tools text and android text can be set in the same textview.
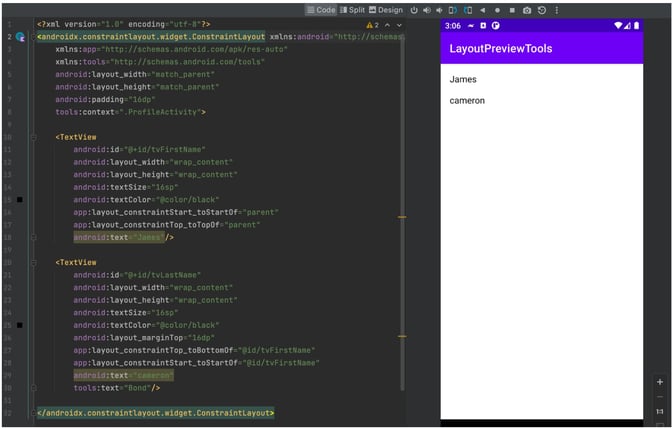
For example, this last name is set to android:text=”Cameron” and tools:text=”Bond”. In the layout preview, ‘Bond’ will be visible because tools text is the main priority, but when the system is run, tools text will be deleted and replaced with ‘Cameron’.
tools:visibility

|

|
There are 2 buttons here, confirm and cancel. The cancel button is set to tools:visibility =”gone”, therefore, we will not be able to see the cancel button in the preview, but will be able to see it in the emulator.
tools:context
Tools:context will help us define whether this ECML is connected to which Java files. When we click on the file’s name, it will open that particular file making it easier to find references of the method. Announcing is also necessary. For example, if the confirm button uses “onClick” and the reference method is “onConfirmClick” under the “.ProfileActivity”. If the “.ProfileActivity” is not announced, the “onClick” will not be able to find the method.
tools:listitem
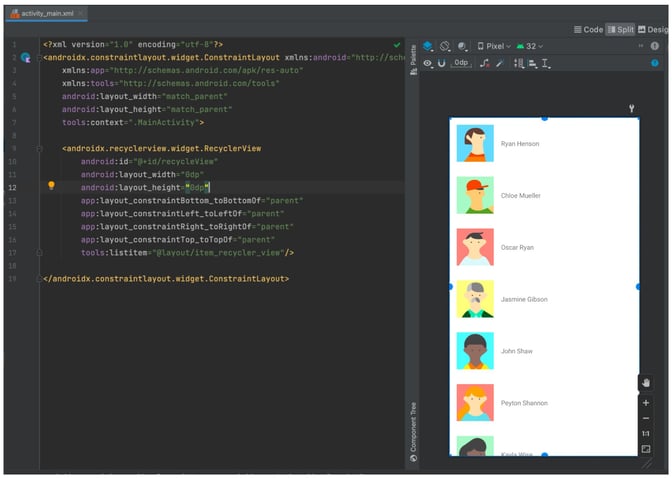
Many Android developers are probably familiar with “RecyclerView” and might face some difficulty when checking the item in it. Usually, you have to run the program to see the result which could take up to many minutes, however, using tools:listitem will allow you see the items in the preview saving quite a lot of time. We have to set it as tools:listitem=”@layout/item_person”. The example here is RecyclerView’s items and on the right side is the preview with a list of names.
tools:itemCount
In RecyclerView, we can set the number of items that we would like to see in the preview by using tools:itemCount=”5″. From the example, it was set to 5, however, it can be change to any number you prefer.
Sample Data
In the case that we want to set text or images to the preview but do not have the content yet, sample data from Android Studio can be used to fill those gaps.
Here are some examples of the attributes.
1) Image View
Image view is used together with data binding. Normally, we have to wait for the information from the API before setting the data binding and checking the visibility in the emulator which takes a lot of time. With this tool, we can set a sample avatar by using tools:src @tools:sample/avatars and the program will randomly pick avatars from the Android Studio.
2) Full Name
After we have the image, it’s full name’s turn. Android Studio also provides us some names. Similar to avatars, type @tools:sample/full_names to randomly pick the name. When we go to the RecyclerView, both random names and avatar will be shown. This can only be seen in the layout preview and will not affect the emulator or the real program and it can save a lot of time from running the application.
3) Text Lorem
In the case that we have textview but no content to fill it yet, we can use tools:text=”@tools:sample/lorem” or tools:text=”@tools:sample/lorem/random” for a longer text. The steps are simple, type “tools” and there will be a pop-up dialogue to choose — it’s not necessary to remember all the commands. The text lorem will be updated after we set the tools attribute, and will be visible in the RecyclerView.
Customized Sample Data

|

|
Sometimes, Android Studio’s sample data might not be enough, adding our customized data is possible.
To add the customized data, open the directory and right click at sample data > new > file. Then, the “register new file type association” window will pop-up. Type the file name that you want and choose “text”. From the example, “Fruits” is used as the file name and the list is fruit names. To use the custom sample data, type tools:text=”@sample/fruits”, then the fruit names will be randomly selected to show on the RecyclerView. Super easy!
If you want to learn more about tools attributes, you can visit Android official website.
Effective Lists Management
The third and the last speaker for the How to code effectively with MAD Meetup, Sittisak (Krit) Tangpraditchai, He goes deep with the effective lists management.
If we are talking about lists in android, Krit suggests we use RecyclerView as the best one for it. In his presentation Krit explained to us about RecyclerViewAdapter, ListAdapter, ConcatAdapter & ListAdapter x ConcatAdapter.
Full walkthrough on RecyclerView can be seen on our YouTube video.
So what is the key takeaway from Krit’s explanation about RecyclerView?
- RecyclerViewAdapter can be the first choice for static list
- ListAdapter can be the first choice for dynamic list
- ConcatAdapter is the option to help to handle with multiple view types