Share this
by Seven Peaks on Aug 26, 2021 5:18:00 PM


Kotlin flows tutorial
My name is Vijay Patel and and I’m working as a senior Android Developer here at Seven Peaks Software. In this tech article we will be discussing how to utilize Kotlin flows in an Android application through my Kotlin flows tutorial.
We will cover both Kotlin flows and channels, as these two features are basically included in the Kotlin Coroutine libraries.
Let’s start by looking into how we can use these tools in Android application development.
One of the challenges we face is related to asynchrony.
The asynchrony challenges which we face, whether it be a network request or whether it may be in database readings, is something which is persistent. An example of a challenge under asynchrony are the race conditions.
Android Kotlin Coroutines
One of the very common issues related to this is a thing called backpressure.
While developing streaming applications, we face these pressure issues, including some leaked resources and threads.
We know how threads are expensive and can cause several other asynchrony issues.

To solve these asynchronous issue in Kotlin, we developed a library called Coroutines, which is a backbone behind both Kotlin flows and channels.
Before moving forward with the flows and channels, lets discuss a little about Coroutines along with the fundamentals on Coroutines.
As Android developers, I’m sure you might have used Kotlin Coroutines before.
Therefore, I would like to go into why Kotlin Coroutines are so powerful in my Kotlin flows tutorial. Some of the features of Kotlin Coroutines are that they are lightweight, allowing you to run multiple Coroutines in a single thread due to the support of suspension.
Challenges of Asynchrony
- Race conditions
- Back pressure
- Leaked resources
- Threading (expensive, starvation, deadlocks)
- and more
This is so you don’t block the thread where the Coroutines are running. One of the incredible features of this is that the suspension feature has fewer memory leaks. Due to using structured con-currency, there are fewer memory leaks. We also have built-in cancellation support too.

Many Jetpack Libraries provide full support for Coroutines. Coroutines can suspend. During the first time, Coroutines can suspend beans, meaning that they can pause.
Basically, it’s like hitting a pause button.
Let’s say when a Coroutine is running inside a thread, they can stop and resume later so that the thread can operate on some other asynchronous processes, probably some other coding.
It does this by choosing when to suspend and when to resume. Let’s say we have two Coroutines, one on the left and one on the right, both Coroutines are running con-currently.
This means that threads can decide which Coroutine to suspend and which to resume, meaning the threads can switch between the Coroutines – almost interweaving among each other.
This will not block the other processes while this is happening.

Channels in Kotlin
To continue, if we want to use some state in the Coroutines, let’s say we want to continue to operate a change-of-state in the Coroutines.
One of the ways we can do this is by communicating between the Coroutines by using a thing called channels.
But before moving forward with channels, we need to make sure that we avoid the shared-mutable-state, as we just want to communicate between two Coroutines.
We don’t want to share the shared-mutable-state, we just want to share some state, that’s it.
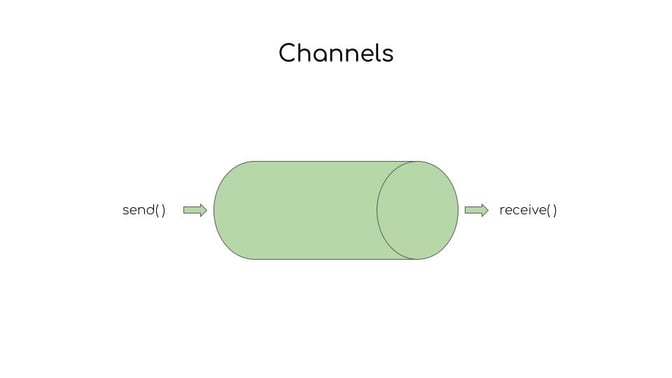
So what are channels? Channels are basically like a pipe, we can send some information, and we can receive some information from them. They are like a synchronous synchronization primitive.
We can send some information into them and they can spit some information out like a non-blocking queue. They have a separate suspending function to send the information to the channel, and they have a separate suspending function to receive the information from the channel.
Watch my simple demo here on how the channel works.
Watch the live coding demonstration of the Kotlin Flows Tutorial below:
Utilizing Kotlin Flows in an Android application by Vijay.

Android Biometrics API
My name is Sifat, I am also working at Seven Peaks Software now as a senior Android developer. I will be discussing about analytic biometrics, Android biometrics API, how to enable biometrics on Android, and how we can integrate analytics biometric in our project.
First of all, as Android developers, I think all of us have some sort of experience with Android biometric API’s – especially for wallet applications or for banking applications.
Android biometric API is a library that provides us a set of API’s which we can use to integrate the Android x app to integrate the biometric authentication in our Android application.
So first of all, the fingerprint manager was introduced back in Android 6 – API level 23. There were two major issues with this fingerprint manager. One was that it didn’t have any UI, and the other was that it only provided developer access to the fingerprint sensor.
As you know, other kinds of biometrics are getting more popular day-by-day in today’s age, just like facial recognition.
Therefore, developers actually started to give feedback as there wasn’t any UI. Meaning that developers had to build their own custom UI. That was another problem because different devices have different kinds of sensors.
For example, some devices have sensors in the display and some devices have sensors in the back. So as a developer, we have to build a custom UI for different kinds of sensors.
Taking these feedbacks into account, the Google Framework team and security team started working on this and in Android 9, they published the fingerprint UI policy, along with the biometric prompt.
The biometric prompt actually gave us access to not only the fingerprint sensor, but also to the other biometric sensors that the developer can use to authenticate a user.
Introduction and Background
Android 6 (API 23)
- FingerprintManager
Android 9 (API 28)
- FingerPrint UI policy
- BiometricPrompt
Android 10 (API 29)
- BiometricManager
It also provides an simple UI, which as a developer, we can customize and we can set some parameters to it. We don’t have to build the UI from scratch.
Another advantage of this was that the device manufacturer now can customize the UI to fit the needs of their particular device. Later in Android 10, the biometric manager was introduced.
The biometric manager gave us the API to check whether the device supports biometric authentication or not. It also provided a fallback, so if we wanted to use non-biometric credentials, like bean, password, or pattern as a fallback to the biometric authentication, we can do that.
Backward Support
API 23
- Support for Biometric Authentication
API 21
- Device Credentials (Pin, Password, or Patterns)
The backward support of Android and vertex biometric API provided support all the way back to API 23. If you wanted to use non-biometric credentials like pin, password, or patterns, it could provide you that support until API 21.
Through the steps to integrate this library into our project, you can see that there are five very simple steps below.
Steps
- Add the Gradle dependency to your app module
- Check whether the device supports biometric authentication
- Build a PromptInfo object
- Create an instance of BiometricPrompt
- Ask User to Authenticate
First of all, we need to add the library dependency into our application module. Then, we have to check whether the device supports biometric authentication or not.
Next, we have to build prompting for the object to create a biometric prompt and then we need to ask the user to authenticate himself/herself.
Watch all these steps in greater detail in my full video presentation.
How to enable biometrics on Android
First of all, the Gradle dependency is now the stable version of 1.1 point zero.
You can add this dependency in your app level Gradle file and sync the project to gain access to all the Android x biometric API.
Add Gradle Dependency
implementation ‘androidx.biometric:biometric:1.1.0’
Then, you will have to check whether the device supports the biometric authentication.
We have to pass an integer value in the parameters – meaning that the integer value represents the type of authentication you’re looking for, so that you can pass one of the three authenticators of the Biometric Weak for database authentication and for the device credentials for non-biometric initial pin, password, or pattern.
Check device’s biometric support
BiometricManager.canAuthenticate(int)
Authenticators:
- BIOMETRIC_WEAK for non-crypto authentication
- BIOMETRIC_STRONG for crypto-based authentication
- DEVICE_CREDENTIAL for non-Biometric Credential
Now, you can combine the flag as well.
If you want to add the device credential as a fallback to your biometric authentication, you can combine Biometric Weak with the device credential and create a new flag.
You have to keep in mind that not all the combinations are supported over all the API’s. For example, you cannot combine the biometric strong and device credential and API level 28 and 29, as it is not supported there.
Also prior to API 30, you cannot only use the device credential.
These are the things you should be considering and later building the prompting for. Prompting for a prompt info is our way to set the meter data and configuration for the biometric prompt.
For prompting there is a visual method. You can set the title, the subtitle, and the description of the biometric prompt. There are also other methods, but among them, I would like to talk especially about the two main methods.
One of them is state-allowed authentication.
Below you can see that we have to pass an integer – this this is the same as the type of authentication you are looking for.

If you want to use the device credential, non-device credential as fallback, you can add it here and then there is another method called set confirmation record that we we can enable or disable via the confirmation button.
If we enable this, it will add the additional layer of confirmation.
Meaning that the user has to face the confirmation button to authenticate himself/herself with the biometric authentication.
For the biometric prompt, we need four basic components. The first one is the fragment activity, or the fragment from, where the biometric prompt will get the fragment manager and the context, to then the prompting for what we just created.
Create BiometricPrompt
BiometricPrompt needs 4 components to work:
- FragmentActivity or Fragment
- PromptInfo object
- AuthenticationCallback:
onAuthenticationSucceeded()
onAuthenticationError()
onAuthenticationFailed()- An Executor (Optional)
ContextCompat.getMainExecutor()
You then have to add the authentication callback, allowing for three different methods.
Watch my full video presentation here covering more in detail.
Authentication succeed, as the name is suggesting, will be called when the authentication is successful. The authentication error will be called if there are any kinds of unrecoverable error.
These errors can happen if the user presses the Back button, enrolls any biometric initial, or the device doesn’t support the biometric authentication.
In those cases, you will get the callback here regarding the authentication error and the next one being the authentication fail.
Meaning that in the initial phase it will be called if the user inputs an invalid credential. For example, if the user inputs a wrong pin or wrong finger to the sensor, then these error methods will be called.
Now, unlike the first two methods, the authentication fail is not a terminal method, it means that if you get called to the failed method, it can still verify itself so you can get a subsequent call, and you can get further calls back if it succeeds or errors. The failure is not our terminal callback for this point.
Lastly, we have to pass an executer (optional).
By default, the callback method of the execute record actually represents in which state or which callback will will be executed – the same thread the biometric authentication will be called from, but if you want to, you can declare a separate thread, or if you prefer this callback to run on a wide set.
Next one the authentication dialog to the user to show the prompt – simply called a biometric prompt or authentication with the prompt info that we created.
We can also cancel the biometric prompt programmatically by calling the biometric prompt: get cancel authentication.
Ask User to Authenticate
Show Prompt:
- BiometricPrompt.authenticate(promptInfo)
Cancel Prompt:
- BiometricPrompt.cancelAuthentication()
Watch the live coding demonstration of Android Biometrics API below:
AndroidX Biometric by Sifat.

Navigation for Android
Hello, everyone, my name is Dmitrii. I’m the Android technical lead here at Seven Peaks Software. I would like to talk about navigation for Android and the simple implementation of Android navigation in applications for Android navigation.
So, what is navigation for Android? And what are the ways to how we can implement it into our apps?
Take a look at the power flow below. When you have only a few screens in your application, the navigation becomes pretty simple.

You just need to have Android launcher, where you tap your application icon and have the first screen. According to the action on this screen, you have to navigate to another screens, and so on.
But what if you have much more screens, and much more actions in your application, as well as lots of works such as deep links or some external actions? The application can become quite messy, and you have to implement some additional classes for this.
Some additional managers may be your controllers, and as Android doesn’t provide any specific patterns for this or any strict requirements for Android navigation, in Android apps you have to be clear to yourself about this.
Usually, we have a few ways of implementation. First, we can switch between screens in our apps. Let’s dive right into this below.

Once you pull activities from this pretty simple pattern in a really simple way, we can use it to switch between screens.
In Android applications and in this pattern, every screen is a single activity which can forward the user to any next screen. Of course, bringing users back this this pattern is very common and it still exists.
Since the first versions of the Android releases, this is the most simple way of integration with navigation. However, it does contain some disadvantages.
One of these is estimating how the user makes use of activities in the application – which can have much overhead due to activity being quite heavy and as well as we having to implement an additional navigation manager which will take care of region between screens.
As soon as we have more than two screens, this logic of integration between screens can become very complex.
Another pattern, which we can use is the single activity pattern, when we have only one single activity in our application and implement every screen as a single fragment, we can use this in our main activity or our activities that we have in our application – like frame layout or any container, which can can be used as a Content folder for fragments.

We can use one or maybe more activities, it depends on your solution and on your business logic.
This one site can simplify the navigation because it has fragments – meaning more lightweight activities.
But we also have the same or similar problem saying we have our layers further in implementation of additional components, additional manager, or controller to take care of the deviation between the screens.
To solve this, we can use some external solutions.
Android navigation components is a new library set of libraries, as I’ve introduced an previously, has become very popular lately being used as a modern-way implementation of navigation in Android apps.
Navigation components already contain the Android navigation controller, and contains a navigation graph. If you want, it can also contain small groups according to your specific requirements.

So basically, the navigation graph is the same fragments, or dialogues, or fragment related views, and the actions or directions between these fragments can be used to switch between screens.
Watch my full live coding video to see how this all works.