Hilt – Jetpack’s recommended DI solution for Android developers
A detailed guide for Android Development in 2022

Benefits of using Hilt in Android application development
Why Hilt? Hilt is an Android dependency injection (DI) library built on top of Dagger to make use of Dagger’s compile-time correctness, runtime efficiency, scalability, and Android Studio support. However, it provides a simpler way to integrate Dagger dependency injection into Android applications.
That’s why right now many companies are starting to take advantage of Hilt in their Android application development for it is more stable and easier to use.
Here are some benefits of using Hilt:
Jetpack integrations.
- Inject ViewModel objects with Hilt
- Integration with the Jetpack navigation library
- Integration with Jetpack Compose
- Inject WorkManager with Hilt
Very easy to set-up.
Developers can just add these dependencies to the app level gradle file
// Hilt
implementation "com.google.dagger:hilt-android:2.38.1"
kapt "com.google.dagger:hilt-compiler:2.38.1"
implementation 'androidx.hilt:hilt-navigation-fragment:1.0.0'
// Hilt tests
testImplementation 'com.google.dagger:hilt-android-testing:2.38.1'
kaptTest 'com.google.dagger:hilt-android-compiler:2.38.1'
// Hilt UI tests
androidTestImplementation 'com.google.dagger:hilt-android-testing:2.38.1'
kaptAndroidTest 'com.google.dagger:hilt-android-compiler:2.38.1'
Then they will be able to use these annotations, and Hilt will be ready to get used:
- @HiltAndroidApp – Application class
- @AndroidEntryPoint – Activity or Fragment for injection
- @HiltViewModel – for ViewModel
Compile time DI (Dependency Injection). It has NO instantiation during runtime.
Easy for tests with only 1 annotations: @HiltAndroidTest
…But there are still some disadvantages found:
-
It does not support FragmentScenario. UI testing still necessitates some boilerplate, however (solution provided by Google already)
-
Because of Unclear logs, it is getting harder to debug.
How Hilt works under the hood
So how do the Hilt annotations work together to generate code?
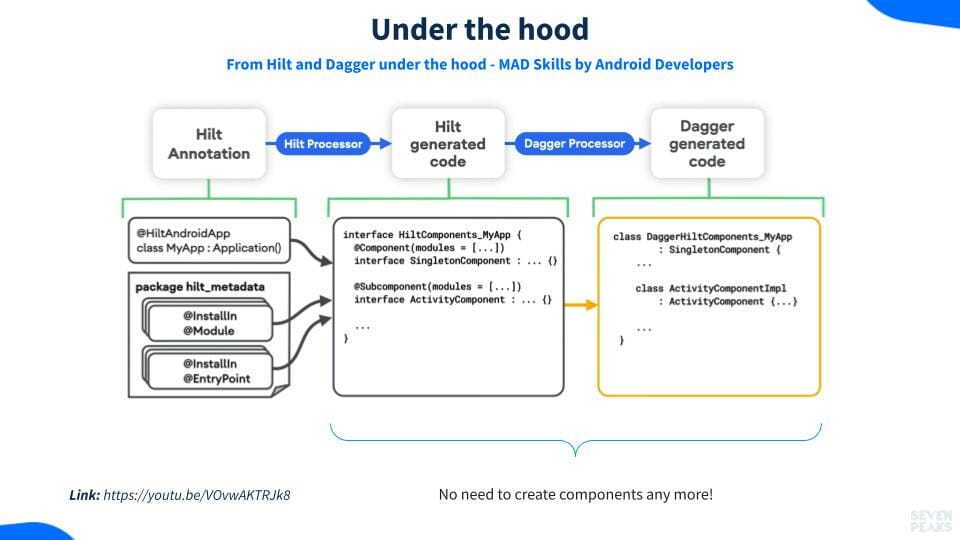
According to MAD guides by Android Developers, Hilt uses annotation processors to generate code. So when turning source files into Java bytecode, the compiler performs annotation processing. Annotations in the source files will then activate annotation processors, as the name implies.
Subsequently, they will examine the annotation and types in order to conduct activities such as validation and generation of new sources.
You can take a closer look about Hilt and Dagger under the hood at MAD Skills.
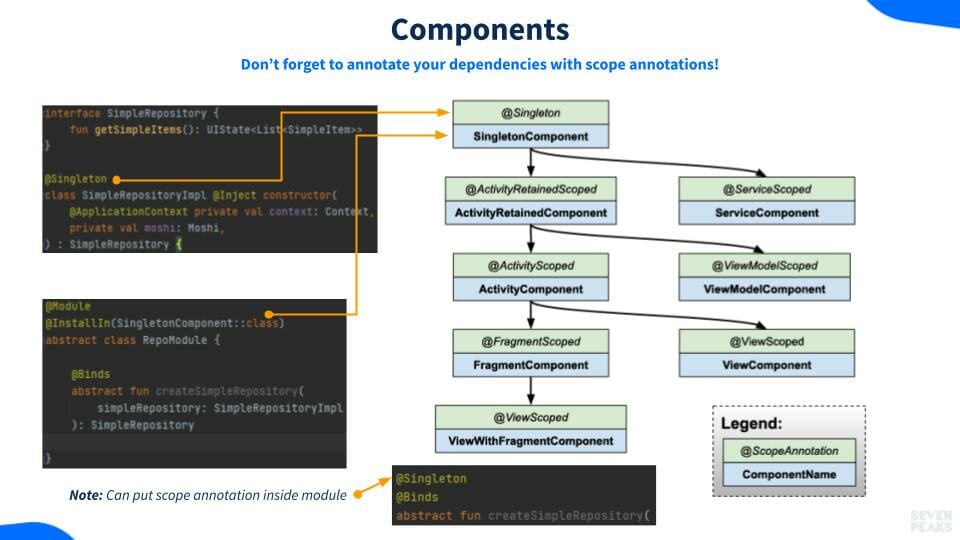
Hilt Components & their Lifecycles
Unlike Dagger, Hilt provides developers with a set of predefined built-in components (along with accompanying scope annotations) to automatically inject into an Android application’s respective lifecycle components like Activity, Fragment or viewModel etc.
The diagram and code sample below show the hierarchy of Hilt’s components.
The scoping annotation above each component shows the scope of bindings to their lifetime, and the arrows under each of them point to their child components. For a binding in a child component, it normally can be dependent on any binding in its ancestor.
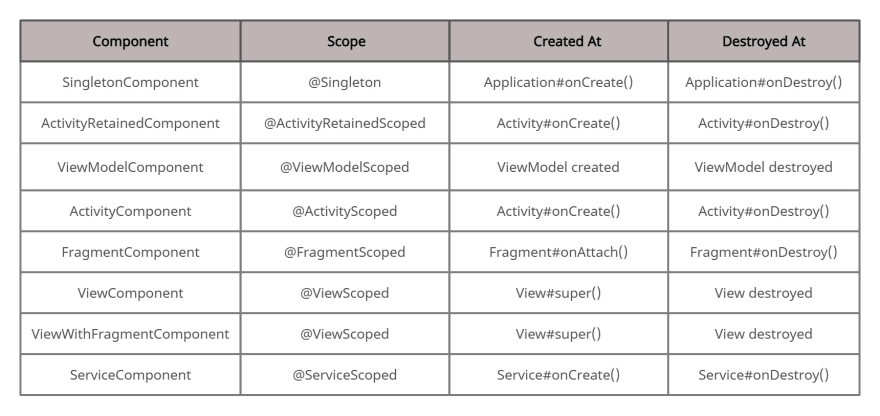
Coming to the component lifetimes, there is a significant relation between the lifetimes of the components and the lifetimes of the bindings. For the reason that in the creation and destruction process of the components, it will limit the lifespan of scoped bindings. Besides it will show the proper time to use the members’ injected values.
In the table below, you can see what each component’s scope annotation and bounded lifetime are.
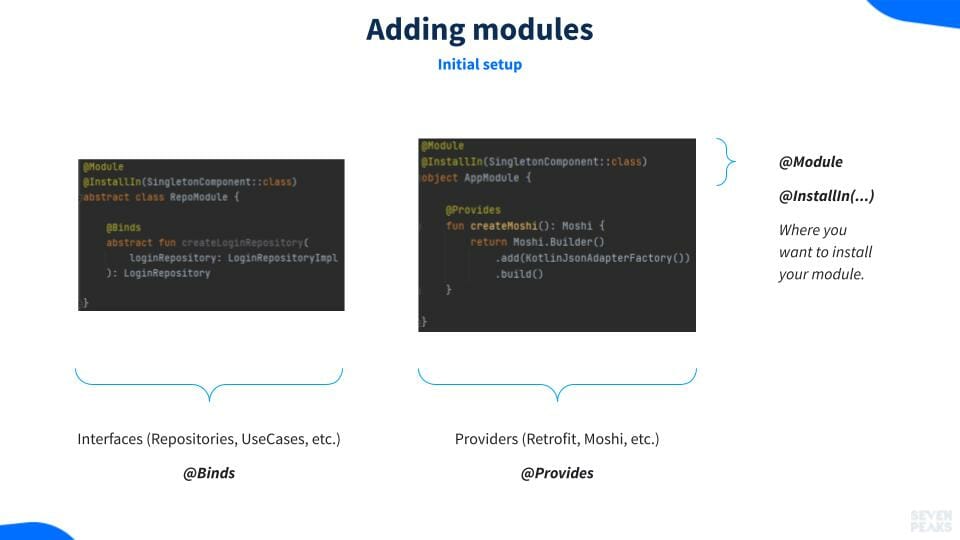
Simply adding Hilt modules
Hilt module is a class annotated with @Module that uses an additional @InstallIn annotation for determining which Hilt components will be in the installation process of the module.
Steps to add modules are uncomplicated. Fundamentally, developers need to annotate their module class with @Module and specify the component name where they want to install the module into. Let’s look at Interfaces for an example.
If you use repositories, you can use @Binds annotation. On the other hand for Providers, if you have some builders from other libraries like Retrofit, or Moshi, you can use @Provides annotation.
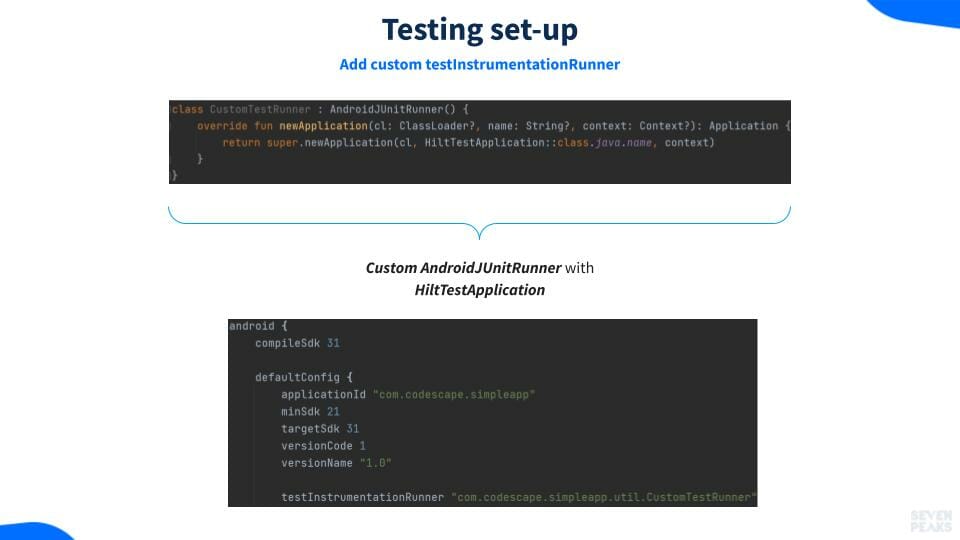
Testing set-up
Next thing to do is to set up to perform testing. In order to use the HiltTestApplication, developers need to configure a new test runner. This will consequently make Hilt work for all of the instrumented tests in the project.
Firstly, create a CustomTestRunner class that extends AndroidJUnitRunner. Then, override the newApplication function and pass the name of the HiltTestApplication that was generated. Further step, configure the test runner in the Gradle file to make sure that the full classpath is used.
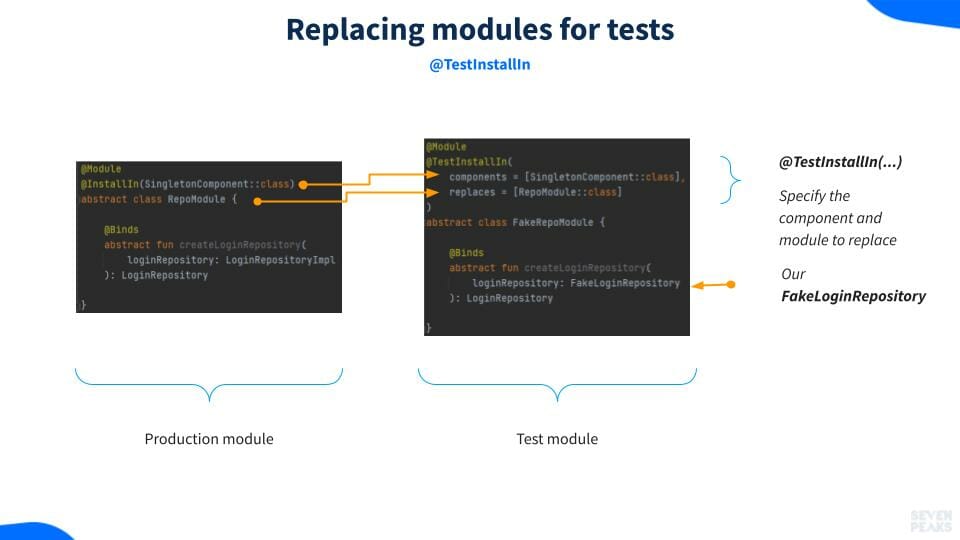
During the testing, there are cases where developers want to replace some modules. As a result, it’s typically useful to be able to replace a production binding with a fake or mock binding to make tests more hermetic or easier to regulate.
For it to work, developers need to create separate test modules annotated with @TestInstallIn annotation. Also they need to specify the component for that module as well as the module it will replace.
In order to uninstall production @InstallIn modules for a particular test, developers should involve a test annotated with @UninstallModules. After removing, the test can install new, test-specific bindings for that specific test.

By the way, replacement modules for specific tests have drawbacks:
- There will be a compilation error if developers try to uninstall a module which is not annotated with @InstallIn.
- Furthermore, they can remove @InstallIn modules only by @UninstallModules, not @TestInstallIn modules.
- As Hilts creates new components for tests that use @UninstallModules, it can significantly impact unit test build times. As a result, use it sparingly and instead prefer to use @TestInstallIn to replace the bindings in all test classes.
How to deal with FragmentScenario
FragmentScenario provides an API to test fragment user’s interface. It works systematically with arbitrary fragments across various versions of Android framework.
There are a few easy steps to follow when implementing FragmentScenario:
Step 1: Add empty HiltTestActivity (debug) AndroidManifest.xml (debug)
Step 2: Use HiltExt with launchFragmentInHiltContainer extension function to launch fragment in container
Step 3: Run your test!