Written by our experienced Android Developer

Introduction
Biometric authentication in mobile devices has been around for quite a few years now and has been adopted largely by device manufacturers and also by users. It is highly likely that every smartphone user has already had some experience with biometric authentication. It is widely used mainly by financial applications to ensure users’ convenience and safety.
In this post, I would like to describe as a developer how we can easily integrate these powerful AndroidX Biometric APIs in our Android Applications and get full advantage of them.
A bit on Background
FingerPrintManager class was introduced in Android 6.0 (API level 23) which would coordinate access to only fingerprint hardware. However, It did not have any UI so developers had to implement customized, device-specific implementations for biometric authentication. Developing customized UI was never easy, on top of that, in-display sensors made life more difficult.
After receiving feedback from developers, Android 9 (API level 28) introduced a standardized fingerprint UI policy. In addition, BiometricPrompt was introduced to onboard more sensors than just fingerprints. This not only provides developers with a set of APIs that they can customize effortlessly to show consistent and familiar UI to the user but also hide the complexity of communicating a wide range of biometric hardware available in the devices. This also benefited OEMs as they now can customize these APIs to implement their own style and also introduce new biometrics without having to worry about developers’ adaptability.
In Android 10 (API level 29) Android Framework and Security team enhanced AndroidX Biometric Library even more which has made all of the biometric behavior from Android 10 available to all devices that run Android 6.0 (API level 23) or higher. In addition to supporting multiple biometric authentications, they introduced BiometricManager which enables developers to check whether a device supports biometric authentication with a single API.
Backward Compatibility
As mentioned earlier, AndroidX Biometric was introduced in Android 10 and it provides support for biometric authentication all the way back to API 23 and to only access device credentials like password, pin, and patterns, it extends support from API 21.
Integration:
Now the fun part!
Biometric authentication can be integrated with 5 simple steps:
Step 1: Add the Gradle dependency
Add the following dependency in the app-level Gradle file
implementation "androidx.biometric:biometric:1.1.0"
Step 2: Check whether the device supports biometric authentication
Biometric library provides BiometricManager to check if the user’s device supports biometric features before you perform any authentication. If it does not, you can show a user-friendly message stating the device does not support biometric authentication.
biometricManager.canAuthenticate(int)
The int value represents the type of Authentication you want. There are 3 types of Authenticators you can choose from:
- BIOMETRIC_WEAK for non-crypto authentication
- BIOMETRIC_STRONG for crypto-based authentication
- DEVICE_CREDENTIAL for non-biometric Credential
private fun authenticateUser() {
val biometricManager = BiometricManager.from(this)
when (biometricManager.canAuthenticate(BIOMETRIC_WEAK)) {
BiometricManager.BIOMETRIC_SUCCESS ->
showBiometricPrompt()
BiometricManager.BIOMETRIC_ERROR_NO_HARDWARE ->
showMessage("There is no suitable hardware")
BiometricManager.BIOMETRIC_ERROR_HW_UNAVAILABLE ->
showMessage("The hardware is unavailable. Try again later")
BiometricManager.BIOMETRIC_ERROR_NONE_ENROLLED ->
showMessage("No biometric or device credential is enrolled")
BiometricManager.BIOMETRIC_ERROR_SECURITY_UPDATE_REQUIRED ->
showMessage("A security vulnerability has been discovered with one or more hardware sensors")
BiometricManager.BIOMETRIC_ERROR_UNSUPPORTED ->
showMessage("The specified options are incompatible with the current Android version")
BiometricManager.BIOMETRIC_STATUS_UNKNOWN ->
showMessage("Unable to determine whether the user can authenticate")
}
}
We can combine these Authenticators like BIOMETRIC_WEAK | DEVICE_CREDENTIAL
But not all the combination is not supported across all the APIs, for example, DEVICE_CREDENTIAL alone is unsupported prior to API 30 BIOMETRIC_STRONG | DEVICE_CREDENTIAL is unsupported on API 28–29
Step 3: Build the UI with PromptInfo object
PromptInfo object contains the metadata and configurations for our BiometricPrompt. We can customize our prompt via the methods setTitle, setSubtitle, setDescription, and setNegativeButtonText. With setAllowedAuthenticators, we can specify if we want to allow device credentials (PIN, pattern or password) as a fallback, and through setConfirmationRequired, we can enable or disable explicit confirmation for implicit authentication methods (like face and iris). It could be useful for scenarios like making a fund transaction where you want to reconfirm with the user before initiating the process.
val promptInfo = BiometricPrompt.PromptInfo.Builder()
.setTitle("AndroidX Biometric")
.setSubtitle("Authenticate user via Biometric")
.setDescription("Please authenticate yourself here")
.setAllowedAuthenticators(BIOMETRIC_WEAK)
.setNegativeButtonText("Cancel")
.setConfirmationRequired(true)
.build()
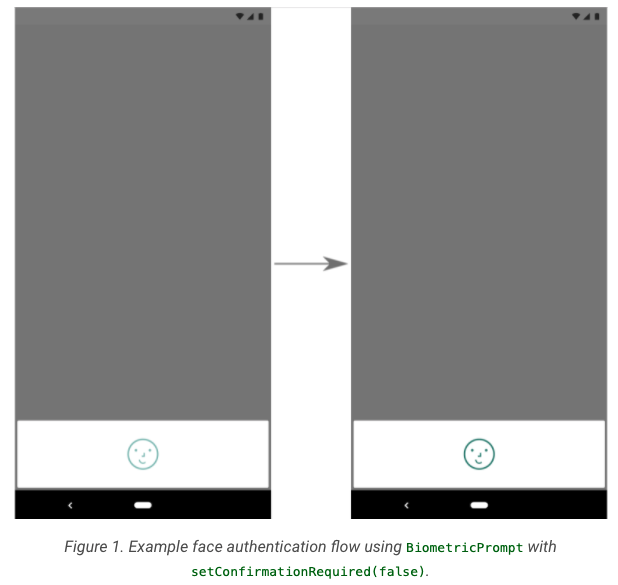
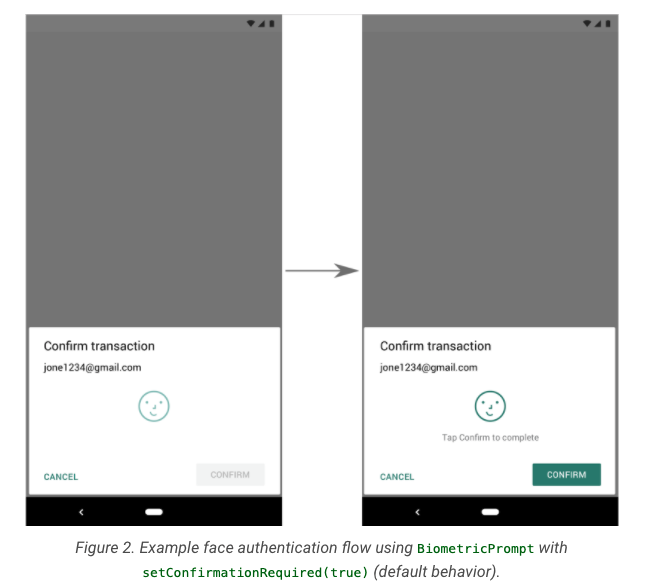
However, showing this explicit confirmation depends on the devices, as a result, explicit confirmation could be ignored in some devices even though it was set to true via the setConfirmationRequired method.
Step 4: Create an instance of BiometricPrompt
AndroidX BiometricPrompt does all the heavy lifting for you. It takes the UI metadata, shows the authentication prompt to the user, and returns the authentication result as a callback. It needs 4 components to work:
- An Activity or Fragment to provide the fragmentManager which will be used to show the authentication dialog.
- The PromptInfo object which contains the UI metadata
- An executor that defines on which thread this callback runs. If we want to run our callback on the UI thread, we can use the main executor from the ContextCompat.getMainExecutor() method.
- An AuthenticationCallback through which we get our authentication result. The AuthenticationCallback contains 3 methods that we can override: onAuthenticationSucceeded, which will be called in case of successful authentication, onAuthenticationFailed, which is called when a biometric was not recognized (for example because a wrong finger was put on the fingerprint sensor), and onAuthenticationError, which is triggered in case of an unrecoverable error, such as when the user canceled the authentication process or when there is no biometrics enrolled on the device. Unlike, onAuthenticationSucceeded and onAuthenticationError, onAuthenticationFailed is not a terminal callback, which means you can expect to receive multiple callbacks in this method.
private val authCallback = object : BiometricPrompt.AuthenticationCallback() {
override fun onAuthenticationSucceeded(result: BiometricPrompt.AuthenticationResult) {
showMessage("Authentication successful")
}
override fun onAuthenticationError(errorCode: Int, errString: CharSequence) {
showMessage("Unrecoverable error => $errString")
}
override fun onAuthenticationFailed() {
showMessage("Could not recognise the user")
}
}
// Step 4
val biometricPrompt = BiometricPrompt(this@MainActivity, ContextCompat.getMainExecutor(this), authCallback)
Step 5: Ask the user to authenticate
Finally, show the biometric prompt to users and ask them to authenticate.biometricPrompt.authenticate(promptInfo)
This prompt can be canceled viabiometricPrompt.cancelAuthentication()
If your app requires the user to authenticate using a Strong biometric or needs to perform cryptographic operations in KeyStore, you should use authenticate(PromptInfo, CryptoObject)instead.
Final Thoughts:
The power of AndroidX Biometric Library lies in, how it has abstracted all the complexities of communicating with different kinds of biometric authentication sensors (like fingerprint, face and iris) and provided simple APIs to developers and OEMs to customize. However, as of now, there is no way to detect which biometric sensor a device has via this library. Hence, you might need to show messages to the user with a generic text like Biometric rather than showing a more specific one like Fingerprint, Face Id.
I hope I have helped you to learn something new today. Happy learning!
Written By
Sifat UI Haque, Android Tech Lead @ Seven Peaks Software